
Welcome to the JC-MACP (Jing Consulting Multi-Agent Chat/Customization Platform) — your gateway to intelligent AI-powered conversations, knowledge management, and custom agent orchestration. This guide will walk you through every feature of the platform, from your first login to mastering the advanced capabilities at your fingertips.
Let us be clear: this platform is not a toy. It is a sophisticated system designed to augment your research, legal analysis, financial insight, and knowledge workflows. Treat it with the respect it deserves, and it will reward you with capabilities that far exceed ordinary chat interfaces.
📑 Table of Contents
1. Getting Started: Login & Registration
Accessing the Platform
Navigate to https://agents.jingconsult.online in your web browser. You will be greeted by the login screen.
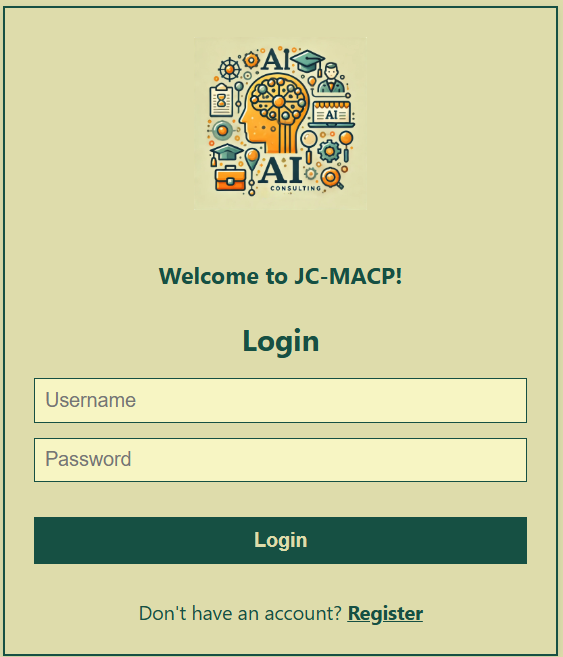 📸 Login page form
Login Process
- Enter your username in the first field
- Enter your password in the second field
- Click the Login button
If your credentials are correct, you will be redirected to the Portal Landing Page. If you encounter an error, double-check your credentials. The system will display specific error messages to help you troubleshoot.
New User Registration
If you do not have an account, click the Register link beneath the login form. You will be directed to the registration page where you can create your account.
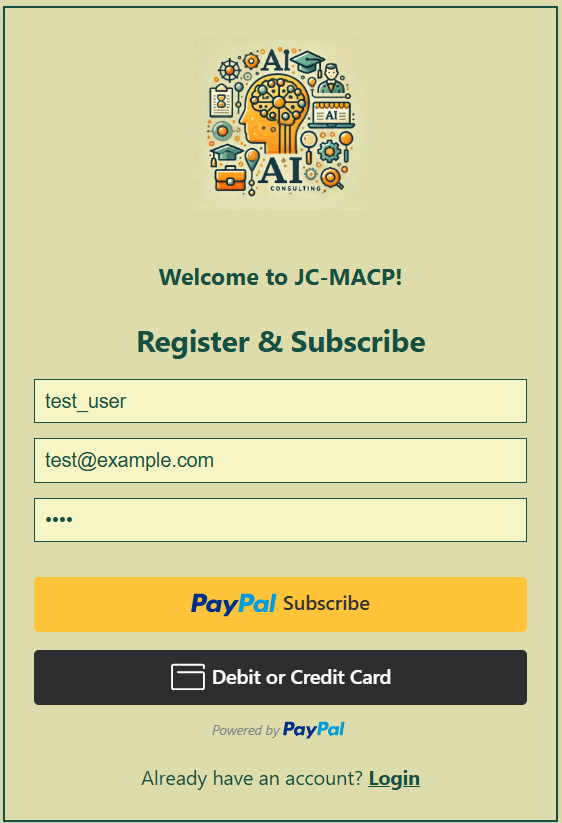 📸 Register page form
Complete the required fields and submit. Once registered, return to the login page to access the platform. The registration currently is authenticated with real username, password, email address, and payment. For demo purpose a separate login credential will be provided on request via Email admin or the Contact page.
2. The Portal Landing Page
Upon successful login, you arrive at the Portal Landing Page — your command center for initiating conversations with AI agents.
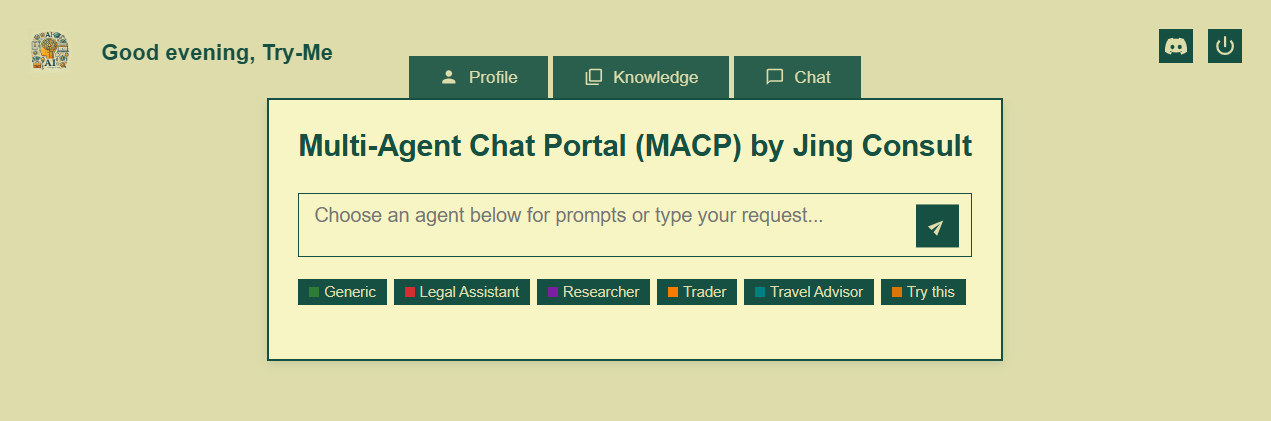 📸 Portal landing page
Understanding the Layout
The landing page features three primary elements:
- Navigation Tabs (Top, left-middle-right):
Portal home (logo button) – Profile, Knowledge base, and Chat pages – JC Discord support, Logout button. - Chat Input Area (Center): Where you type your queries with/without the selected default/custom agent and task prompt.
- Agent Domain Prompt Cards (Below Input): Visual representation and prompt assisting of available agent domains and their specializations
Domain Hierarchy Cards
The domain cards represent your available AI agent categories. Each card expands to reveal subdomains (specializations) when clicked.
How to use domain cards:
- Click a domain card to expand it and view available subdomains
- Click a subdomain to select that specialization for your query
- Some subdomains trigger context modals (e.g., ticker selection for Trader, jurisdiction selection for Legal)
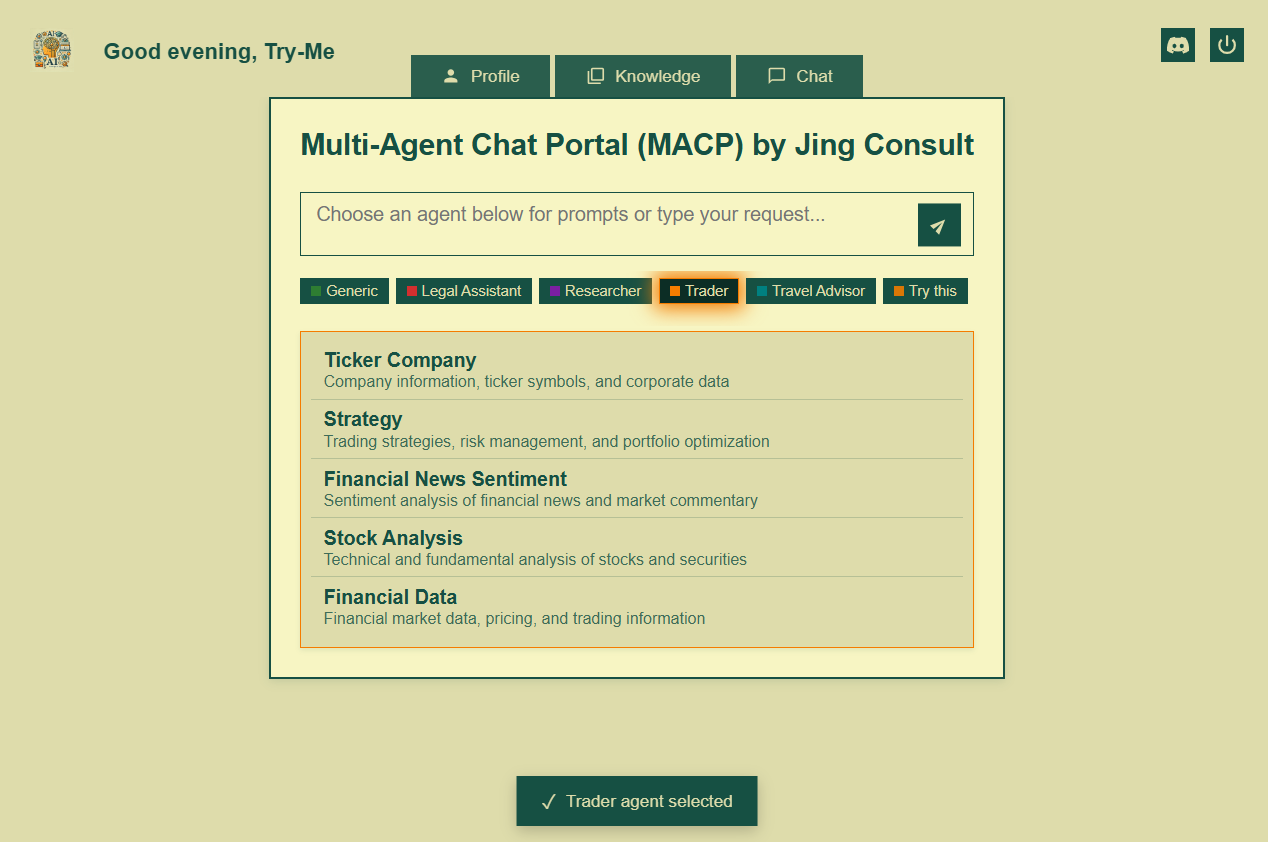
📸 Expanded agent domain card: e.g. Trader agent with subdomains like “Market Analysis,” “Portfolio Strategy,” “Financial News”. Clicking on the subdomain task would trigger the ticker symbol search and selector window to embed the selected ticker context inside the ‘Trader’ agentic query prompt input field.
Initiating a Conversation
Type your query in the central input field and press Enter or click the send button. The system will:
- Analyze your intent
- Route your query to the appropriate agent (if no nominated agent is implied as above)
- Create a new chat session
- Redirect you to the Chat page with your response
3. Profile Management
Access your profile by clicking the Profile tab in the navigation header. The Profile page contains three sub-tabs: user Profile info, Sessions, and user’s Agents.

📸 Profile page: three sub-tabs showing the Profile, Sessions, Agents content.
3.1 User Profile Information Tab
The user Profile info tab displays and allows editing of your profile/preference details.
Available actions:
- View your profile info, bio, expertise, experiences, language model/agent preferences
- Edit and update your profile details and preferences
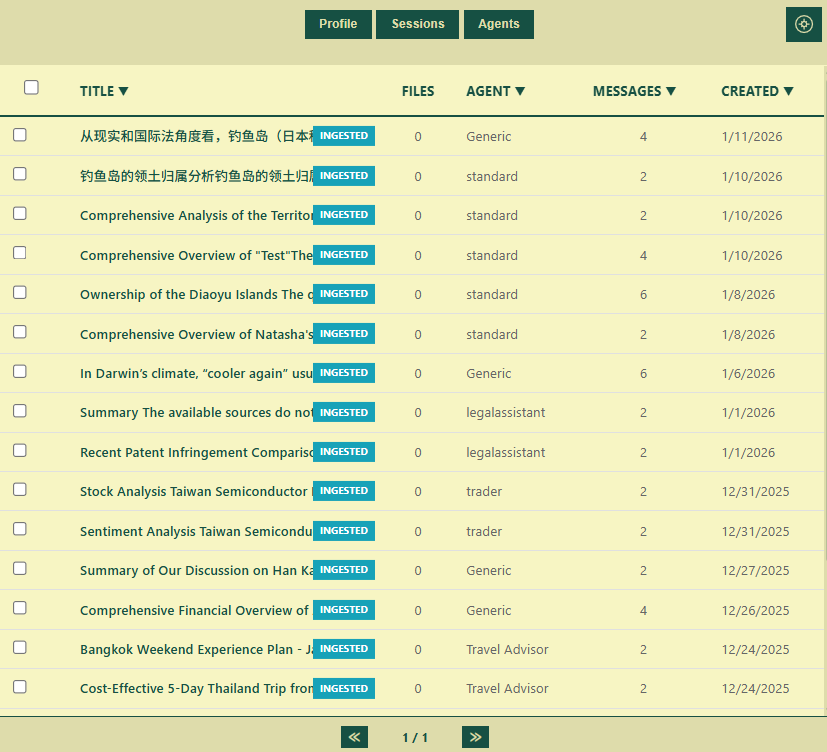
3.2 Sessions Tab
The Sessions tab provides a comprehensive view of all your conversation sessions, past and present.
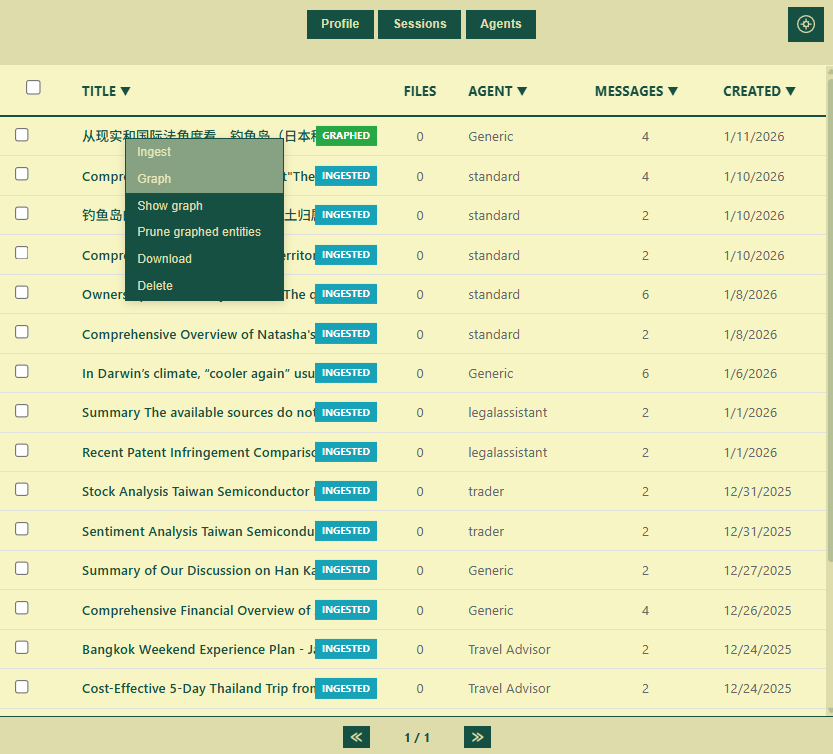
📸 Sessions tab content: session list with columns for title, message count, created date, status (ingested/graphed), embedded file count, and action buttons (including the session memory communities button).
Session List Features
Each session row displays:
- Session Title: The automatically or manually assigned name
- File in the Session: File count for those that have been assigned to the session
- Message Count: Number of messages in the session
- Created Date: When the session was started
- Status Badges: Indicators for ‘Ingested‘ and ‘Graphed‘ statuses
Session Memory Actions
Individual Session Actions (accessible via the action menu on each row click):
- Ingest Session: Converts your session messages into text chunks and embeddings stored in the relational/vector databases, this is an automatic feature running in the back-end normally needn’t any user intervention as long as the session has got non-empty content
- Graph Session: Extracts memory entities (people, concepts, topics etc.) from the chunk and embedded sessions for cross-session memory entity/relationship extraction, this is a semi-automatic feature depending on user’s choice of whether to graph the session or not (the choice is also available on the ‘Chat‘ page’s session response message control when condition is met)
- View Memory Graph: Opens a visualization of the entities and relationships extracted from this session
- Prune Entities: Removes extracted entities while keeping the session and its text chunks/embeddings intact
- Delete Session: Permanently removes the session and all associated data
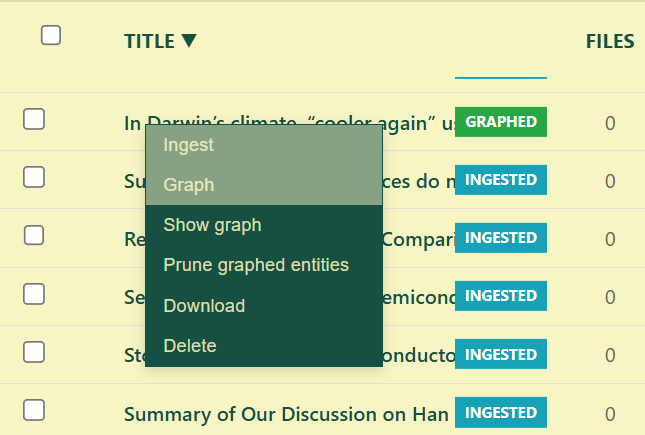
📸 Session action drop-down menu: Ingest, Graph, View Graph, Prune, Delete options.
Bulk Session Actions (when multiple sessions are selected):
- Select sessions using the check-boxes
- Use the bulk action toolbar that appears:
- Ingest Selected: Batch ingest multiple sessions
- Graph Selected: Batch extract entities/rels from multiple sessions
- Cross-Session Graph: Visualize entities across all selected sessions
- Download Synthesis: Export a synthesized report from selected sessions
- Delete Selected: Remove multiple sessions at once
Session Memory Communities
Above the session list at the top right corner of the sessions table, you’ll find ‘Session Memory Communities‘ button. Click the button to open the Session Community Visualization modal. This displays the overall clustered semantic communities of related concepts across your sessions.
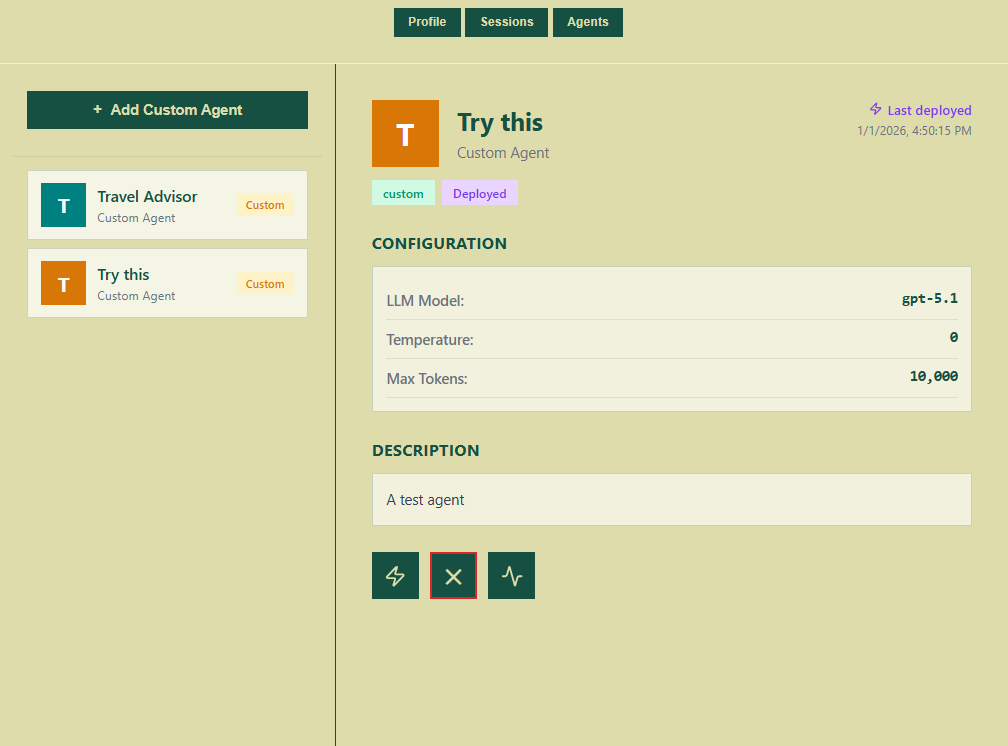
3.3 My Agents Tab
The Agents tab is where you manage and customize your AI agents.
Agent Categories
Agents are organized into three tiers (demo users can only view, create, edit, delete tier-3 custom agents):
- System Agents (Core): The foundational orchestration and cardinal agents (ProjectManager, RetrieverRagger, SessionRagger, ResponseFormulator, Scraper) — these work behind the scenes
- Specialty Agents: Purpose-built factory/demo agents for specific domains (Legal Assistant, Trader, Researcher)
- Custom Agents: Your personally created agents, including those deployed via MACP-Langflow
Note: you can click the + Add Custom Agent button to create a new custom agent/domain for the agent and domain listing addition at the current ‘Agent List’, ‘Chat‘ page’s ‘+ New Chat’ menu, and ‘Knowledge‘ page’s ‘Domain Filter’ panel.
Agent List
Each agent card displays: Agent name and icon, Agent tier/type badge, edit Agent detail/color buttons on hovering.
Agent Details Panel
Click on any agent on the list to open its details panel on the right side of the screen. This includes the agent’s deployment status (if applicable), configuration, description, its LangGraph and/or Langflow edit/revoke buttons.
Agent Actions (demo user’s custom agent only)
Custom Agents:
- Edit in Agent Builder: Opens the MACP-Langflow visual editor (flows.jingconsult.online) where you can design and modify your agent’s workflow
- Revoke Deployment: Removes the MACP-Langflow deployment from the agent
- Delete Agent: Permanently removes the custom agent
Note: Custom agentic flow on the MACP-AB will be walked through in JC-MACP (Custom Agent) post.
4. Knowledge Management
Access the Knowledge base by clicking the Knowledge tab. This is your file repository and semantic knowledge center.
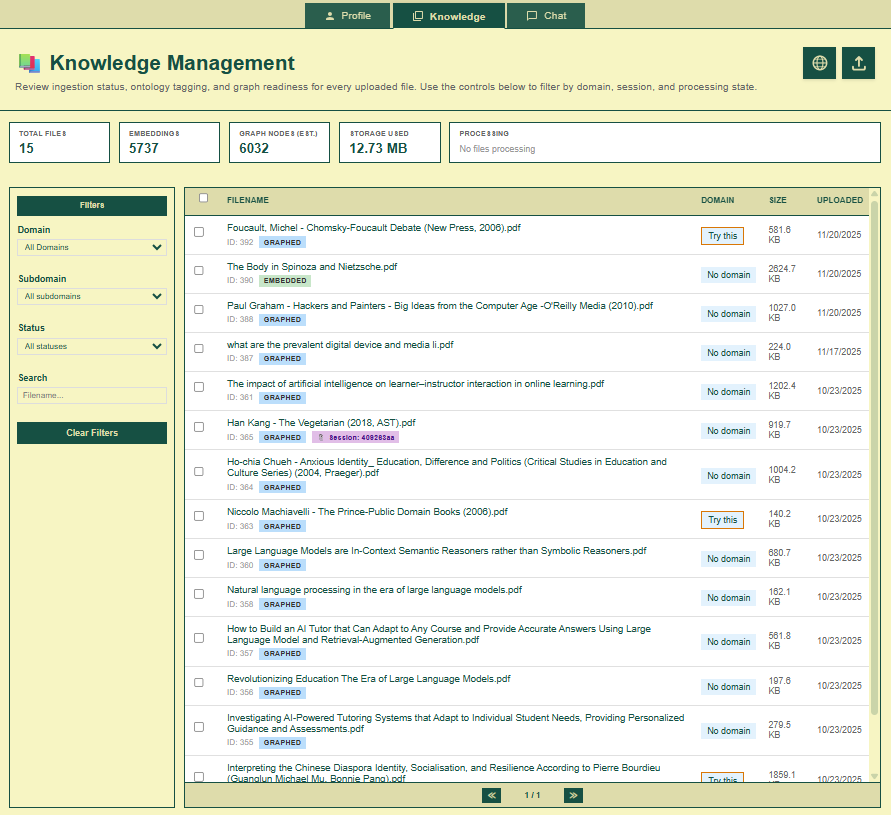
📸 Knowledge Management: knowledge files stats, domain filter panel & knowledge management/file table controls.
Knowledge Files Statistics
At the top of the page, you’ll see a statistics panel summarizing your knowledge base:
- Total Files: Number of uploaded files
- Embeddings: Number of embedded file chunks
- Graphed Nodes: Number of extracted entities
- Storage Used: Overall disk space used for the uploaded/ingested/graphed files in the current user account
- Processing (status): This would be active to show the real-time file processing status and progress upon user’s file action committed.
Domain Filter
On the left side, the agent Domain filter organizes your files by agent domain if any file has been previously fed to the agent.
Interacting with the Domain filter:
- Click an agent domain to filter the file table to show only files in that domain
- Expand a domain to see subdomains (if any)
Note: the Domain filter gets updated with new domain by the ‘+ Add Custom Agent’ actions at the Profile/Agents UI.
4.1 File Upload & Organization
Uploading Files
Click the Upload Files button to select files from your local device.
Upload Limits:
- Supported formats: PDF, TXT, MD, DOCX, CSV, XLSX, XLS
- Maximum file size: 2MB per file
File Table
The main file table displays all your uploaded files with the following columns:
| Column | Description |
|---|---|
| Select | Checkbox for bulk actions |
| Filename | The file name (click to expand details) |
| Domain | Assigned knowledge domain |
| Size | Original file size (MACP does not store any original file after processing) |
| Uploaded | Initial file uploading date |
File Status Badges
Each file displays status badges indicating its processing state:
- Embedded: File has been chunked into text segments and embedded to the vector store
- Graphed: Entities have been extracted (shows entity count)
- Session: File is assigned to a chat session
- Domain: File is fed to an existing agent domain
4.2 GraphRAG Processing
GraphRAG (Graph-based Retrieval Augmented Generation) is the core technology that makes your files semantically searchable and to ready the grounding based on your provided knowledge to rectify/augment AI agentic response factuality and rigor.
Graphing a File
- Locate the file (prerequisite file status should be ‘Embedded‘) in the file table
- Click on the file row to trigger the Action menu
- Select Graph File
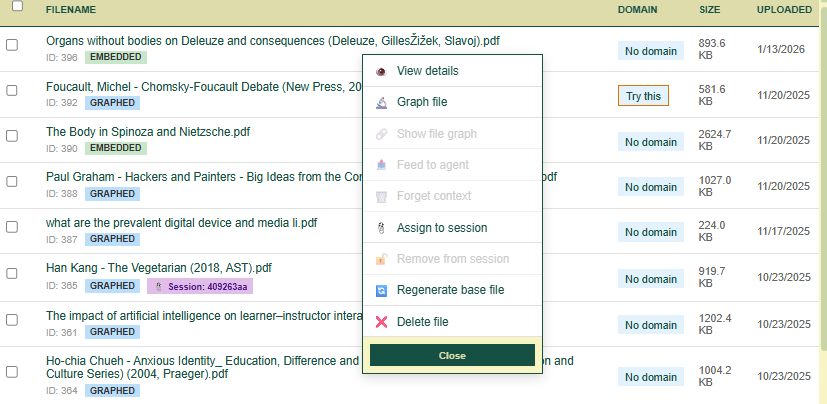
📸 File action menu: Graph File, Feed to Agent, Show Graph, Forget Context, Assign to Session, Delete etc. options.
The system will:
- Extract entities (people, organizations, concepts, locations, etc) from the file
- Create relationships between entities
- Build a semantic graph for intelligent retrieval
Processing Indicator: A progress bar and status updates will appear during graphing.
Viewing the Knowledge Graph
After graphing, click Show Knowledge Graph from the action menu to visualize the extracted entities.
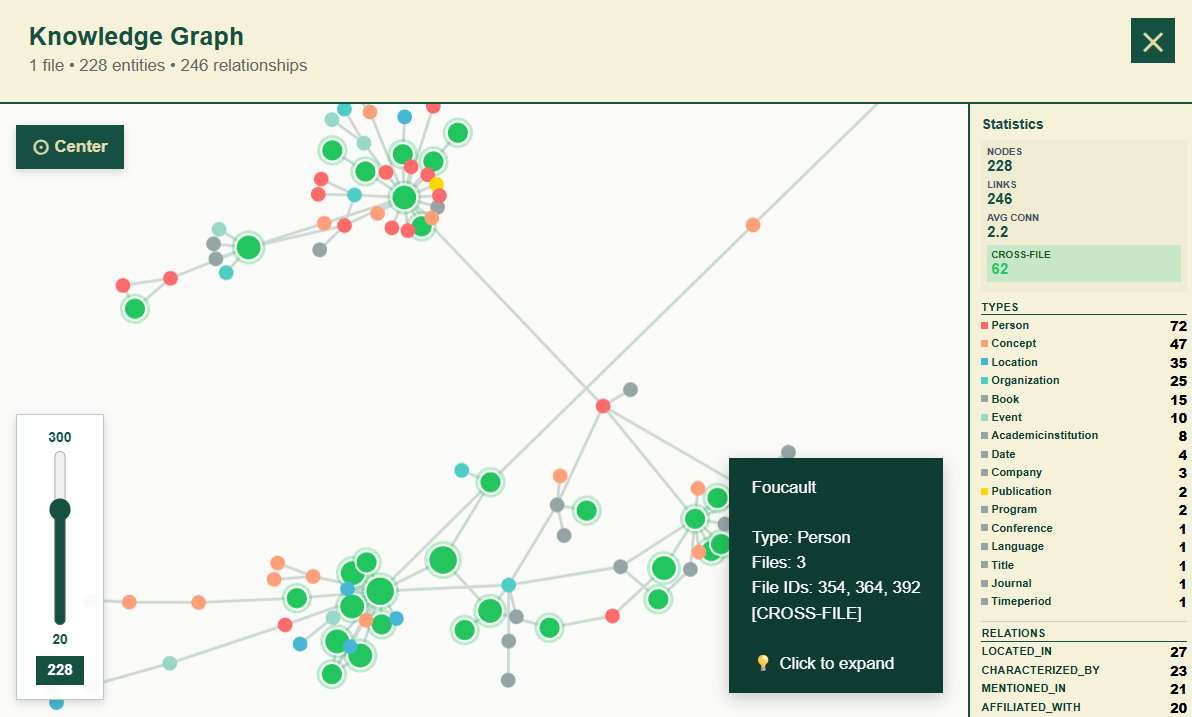
📸 Graph Visualization modal: entity nodes connected by relationship edges, with different node colors representing entity types (Person, Organization, Concept, etc.).
Graph Features:
- Zoom & Pan: Use mouse scroll and drag to navigate
- Node Selection: Click nodes to highlight connected entities
- Entity Details: Hover over nodes to see entity information
- Color Legend: Different colors represent different entity types
4.3 Agent Contextualization
To make a file’s knowledge available to a specific agent during conversations:
- Click the Action menu on the file row (prerequisite file status should be at least ‘Graphed‘)
- Select Feed to Agent
- Choose the target agent/domain from the modal
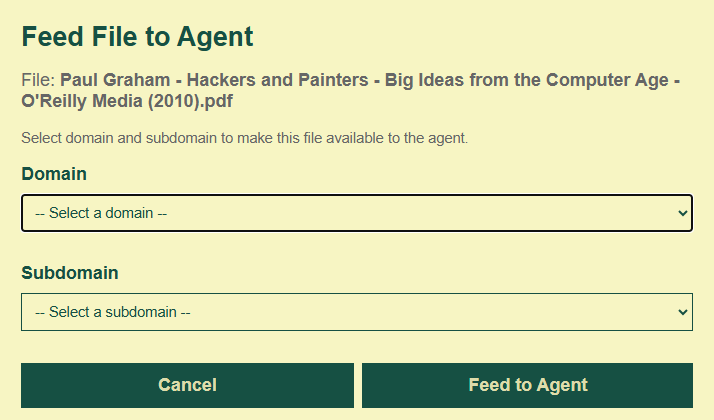
📸 Feed to Agent modal: a list of available agent domains/subdomains to select.
Once contextualized, the file’s content will be retrievable when chatting with that agent.
To remove contextualization:
- Click the Action menu
- Select Forget Context
This detaches the file from the agent without deleting the file.
Bulk File Actions
Select multiple files using the check-boxes, then use the bulk action bar that appears:
- Update Domain: Assign all selected files to a new domain
- Bulk Detach: Remove agent contextualization from all selected files
- Delete Selected: Permanently remove all selected files
Community Visualization
Click View Global Knowledge Communities button in the Knowledge page header to see how your cross-file knowledge have been semantically clustered.
5. Chat Interface
The Chat page is where you interact with your AI agents. Access it via the Chat tab.
📸 Full Chat page: session list/agent files sidebar on left, message area in center, and source/chat files panel on right.
5.1 Session Management
Session Sidebar
The left sidebar lists all your conversation sessions.
Session List Features:
- Active Session: Highlighted with accent color
- Session Preview: First line of the summary of the recent message
- Timestamp: When the session was created or last active
Session Options
Hover over a session for option buttons:
- Rename Session: Change the session title
- Delete Session: Remove the session permanently
5.2 Agent Selection & Specialty Agents
Agent Selector Drop-down
At the top of the message area, find the circled ‘+’ (New Chat Session) button to get the agent selector drop-down menu. This controls which agent handles your queries.

📸 Agent Selector drop-down: all available agents to user.
Selecting an Agent:
- Click the drop-down
- Choose from:
- Specialty Agents: Legal Assistant, Trader, Researcher
- Custom Agents: Your personally created agents
Specialty Agent Indicators
When a specialty agent is active, an indicator badge appears below the input area.
E.g. Legal Assistant Mode
When engaging with legal queries, the Refine Legal Context modal may appear to refine your search:
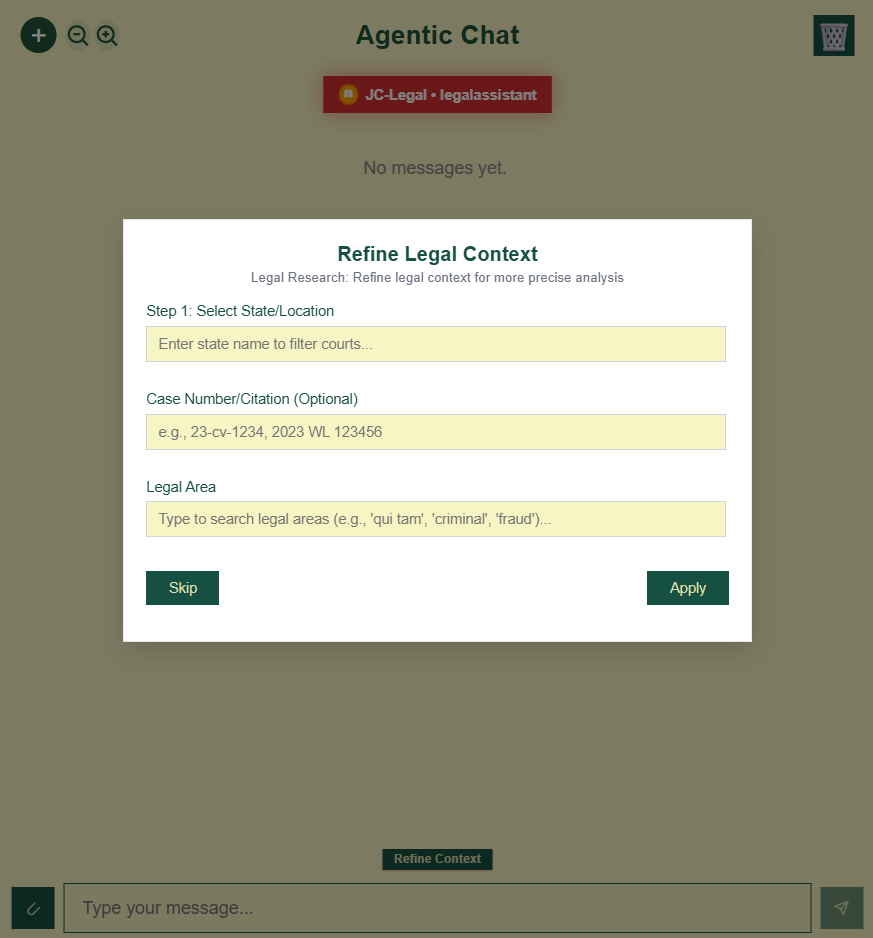
📸 Legal Context modal: courts selection, jurisdiction filters, and case number input field.
Configuration Options:
- Courts: Select specific courts (Supreme Court, Circuit Courts, etc.)
- Jurisdictions: Filter by state or federal jurisdiction
- Case Number: Search for a specific case
- Legal Area: Focus on specific practice areas
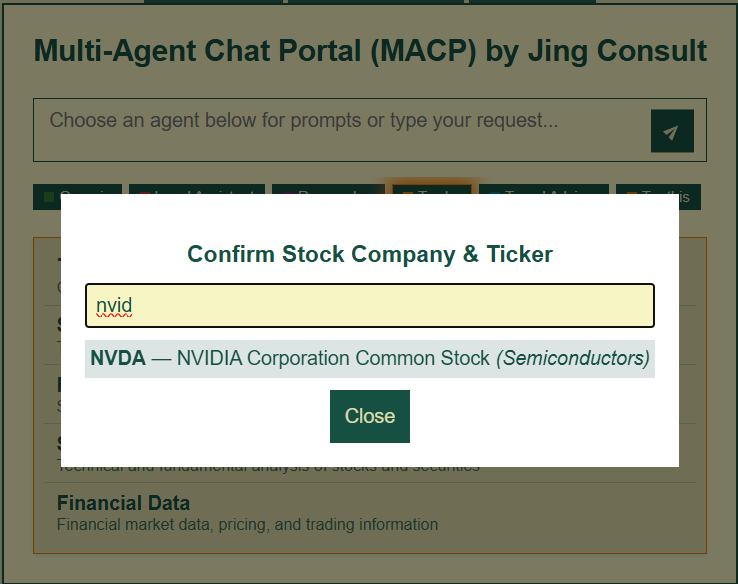
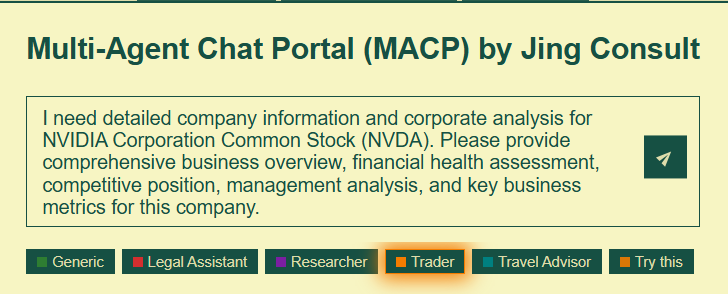
E.g. Trader Mode
For financial queries, the Ticker, Range, Date Select modals help refine/specify your financial/stock context:
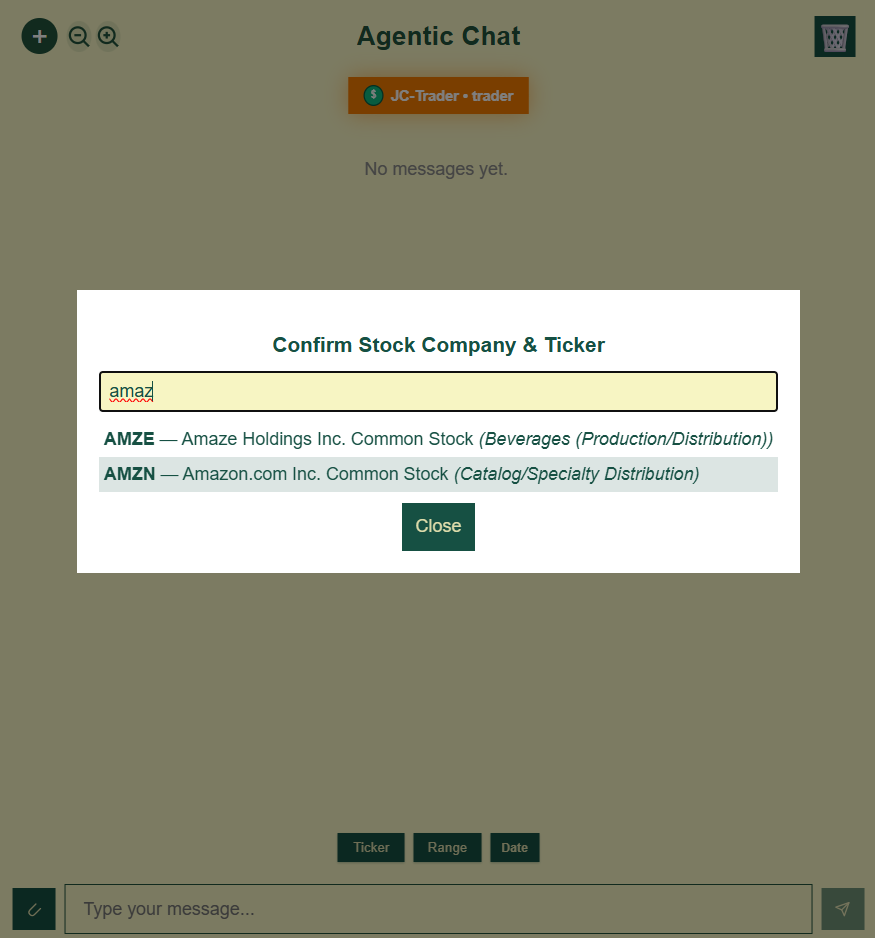
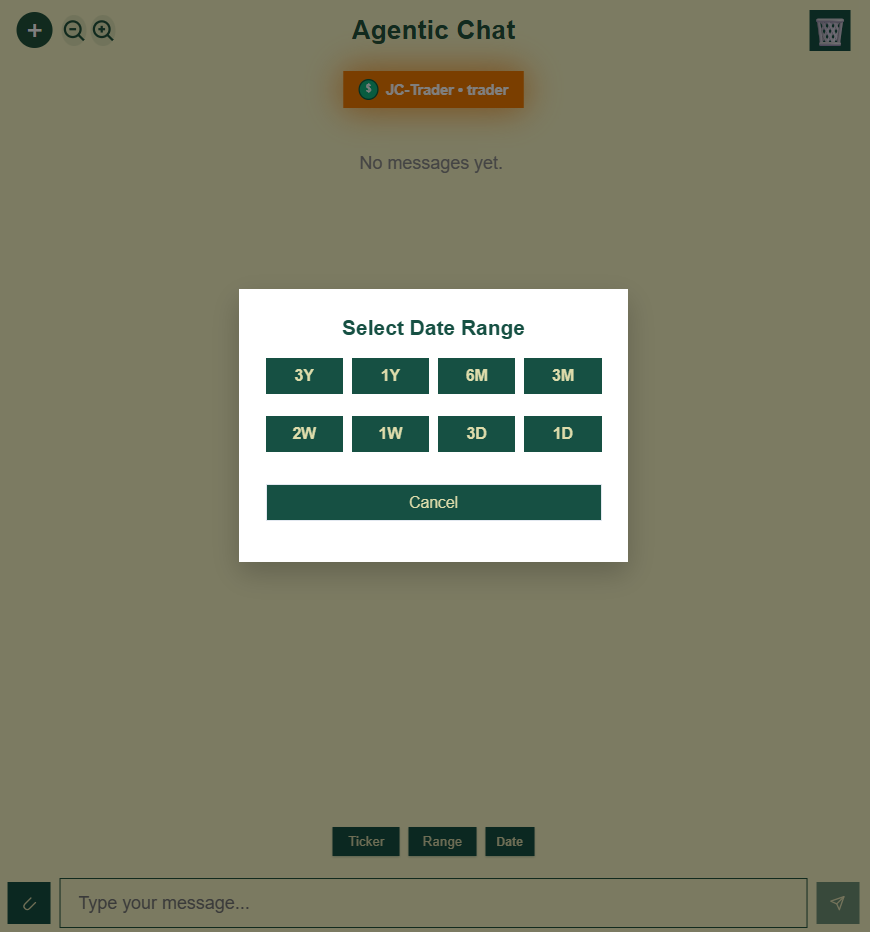
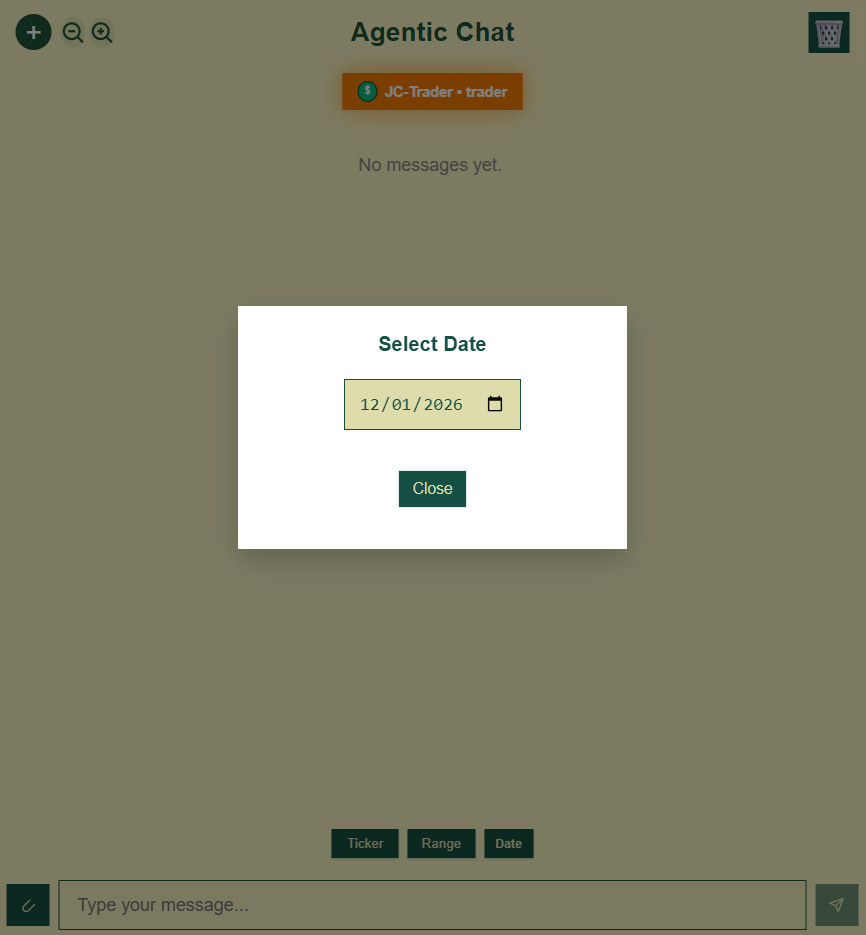
📸 Ticker, Range, Date Select modals: search field, matched tickers, and company name display; inquiry date range; specific date.
Actions:
- Search for stock tickers
- Select from recent tickers
- Confirm selection to contextualize or inject structured prompt into your financial/trader agentic query
5.3 File Attachments in Chat
Attaching Files to a Session
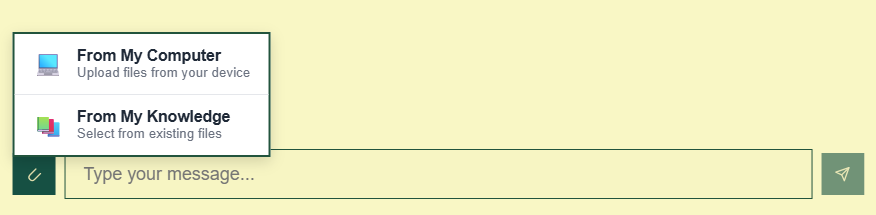
Click the Attachment icon (📎) in the input area to open file options.
Attachment Options:
- Upload from Computer: Upload a new file directly in chat
- From My Knowledge: Select files (only those have not been assigned to any session or fed to any agent yet) from your Knowledge base
- Recently Used: Quick access to recently attached files
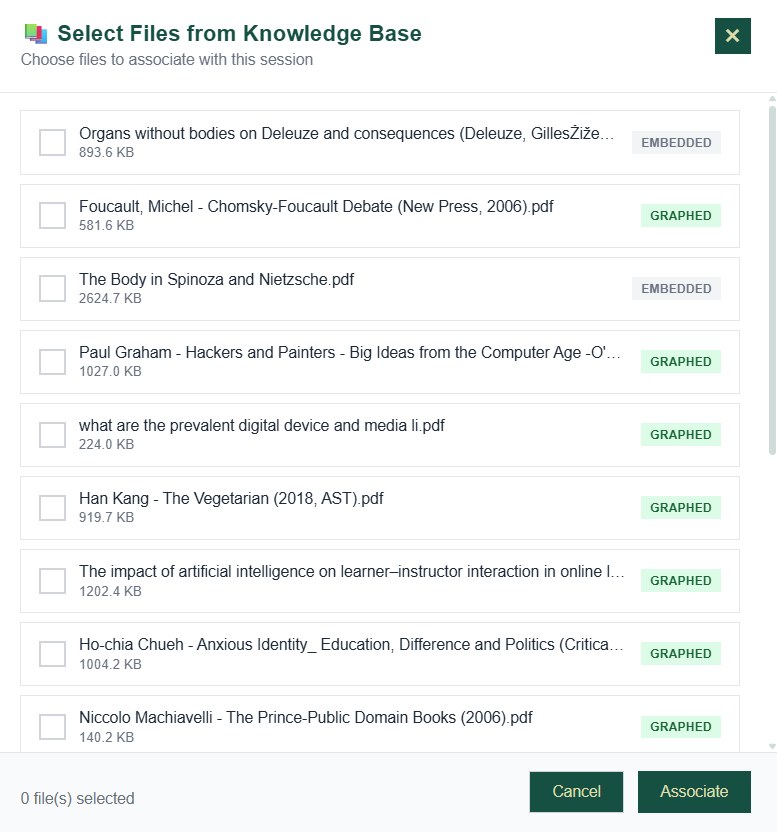
 📸
📸
“From My Knowledge” modal: Knowledge base files that are available for session-assignment selection.
Chat Files Panel
When files are attached, a files panel appears on the right side of the chat.
File Status in Chat:
- Uploaded: File is attached but not graphed
- Graphed: File has been processed (shows entity count)
Per-File Actions in Chat:
- Graph: Process the file for entity extraction
- Unassign: Remove from session
- Pause/Resume: Temporarily exclude from file processing
5.4 Message Features
Sending Messages
Type your message in the input field at the bottom and press Enter or click the send button.
Message Display
Messages appear in a conversational format:
- Your messages: Right-aligned with accent styling
- Agent responses: Left-aligned with response formatting
Response Features
Agent responses may include:
- Markdown formatting: Headers, lists, code blocks
- Citations: Numbered references to source material
- Source Panel: Expandable section showing retrieved sources
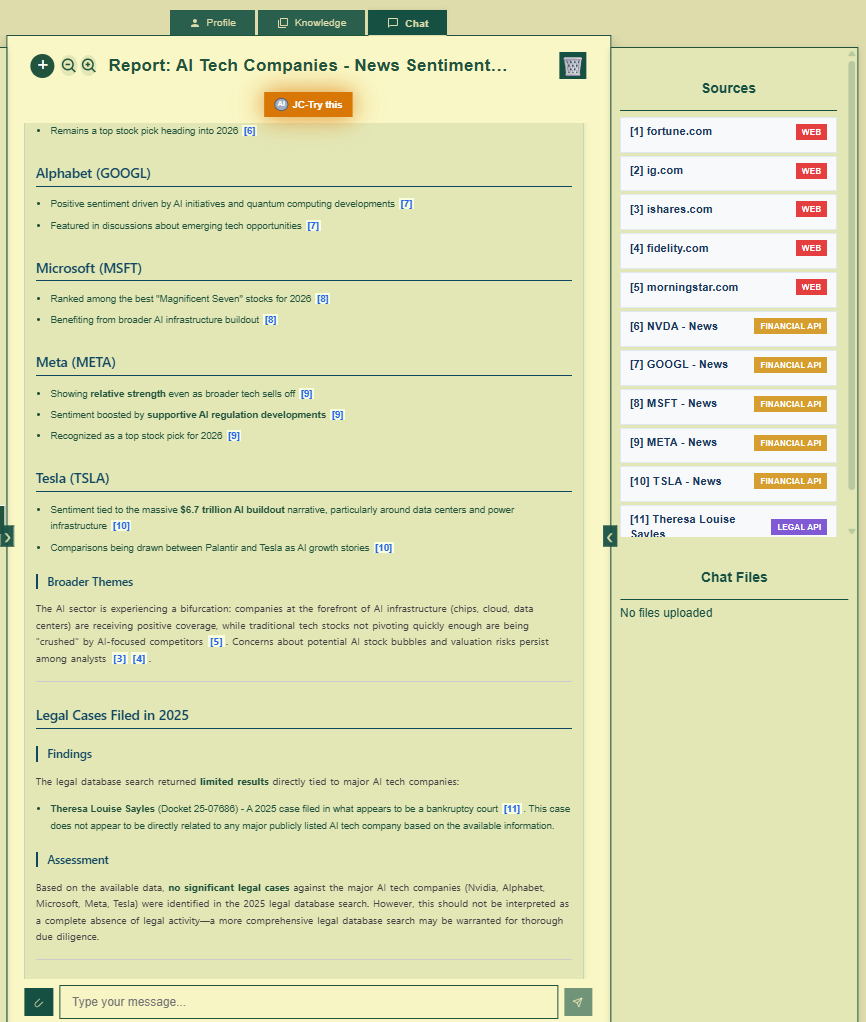

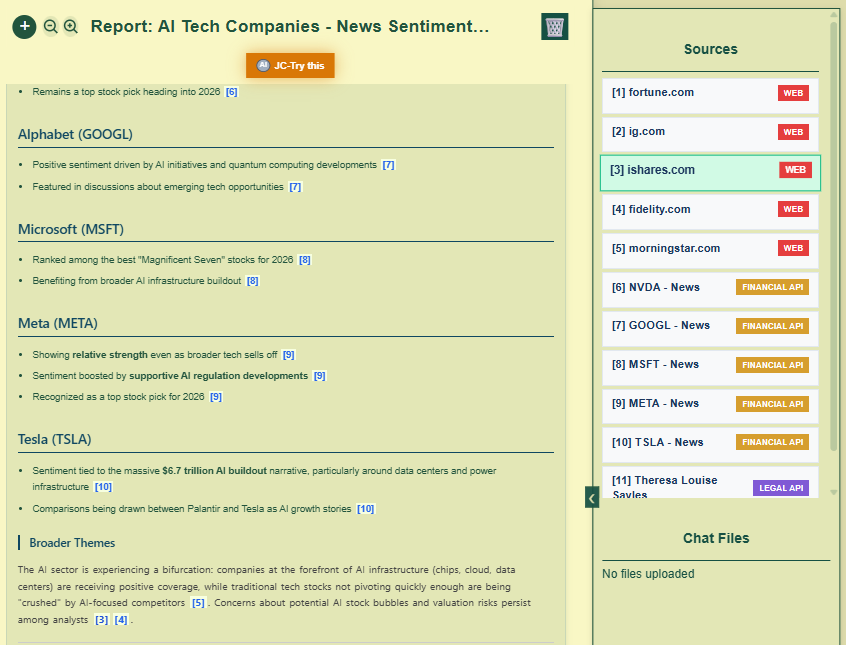
📸 Agent response with citations and expanded source panel: in-text citation link hovered to show the source snippets and the highlighted corresponding source item (e.g. [3] citation link was clicked) listing to track further of the origin of the source.
Message Actions
Hover over a message to reveal action buttons:
- Copy: Copy message text to clipboard
- Download: Download the response message in markdown (.md) format
- Delete: Remove the message from the session
- Session Memory Graphing: Reminder button at the end of the response message to enable the background session memory graphing (notification toast message is sent to notify user of the graphing progress, direct graphing effect can be checked about at the ‘Profile‘ page’s ‘Sessions‘ tab)
Translation
Click the Translation drop-down to switch/restore messages between default response message language and other listed languages by your selection.
Related Previous Conversations
At the bottom of relevant responses (this footer feature only available to the factory and custom agentic chat sessions by user’s active choice in the ‘new chat’ button agent selection menu), you may see a “Related Previous Conversations“ footer. This leverages your session memory graph to surface relevant past discussions, if any. Click on a link to navigate directly to that historical message in the referenced session.
6. Closing Notes
You now have the knowledge to navigate every corner of the JC-MACP platform. Remember these key principles:
- Graph your files — Raw uploads are useful, but graphed files enable semantic retrieval that transforms your search capabilities, but due to the remote API request, file size limit applied (2MB/file)
- Ingest and graph your sessions — Your conversation history becomes searchable memory when processed through the graph pipeline, although these session memory related features are automatic and semi-automatic, you can always double check if they have been performed at the ‘Profile/Sessions‘ UI
- Use specialty agents appropriately — The Legal Assistant, Trader, and Researcher agents are purpose-built for their preset domains; they deliver superior results for their specializations but subject to the accessibility to the specialty API connection. So if the results are not optimal or expected, it is probably the specialty API data retrieval has been suppressed.
- Create custom agents — For workflows unique to your needs, use the agentic flow builder to craft custom processing pipelines and deploy it back to the created agent for your own information needs.
The whole MACP site app is best rendered using your desktop browser as the mobile UI has not been optimized. The MACP app has been developed by the owner using AI coding packages such as Windsurf, AntiGravity, and Cursor. This platform is a demo tool only. Its applicable power to your very own use case or enterprise scales with your investment in organizing knowledge and understanding its capabilities. Use it wisely and let’s get in touch to further the AI app implementation to suit your intelligence demand.
- The video walkthrough can be viewed here (or via the MACP-Walkthrough YouTube)
- For technical documentation and API references, see the JC-MACP (Technical).
- For questions or support during testing, contact us here or via the development team’s DISCORD – Jing Consult AI Startup Community #jc-support channel.
Document Version: 1.0
Last Updated: January 12, 2026
Platform URL: https://agents.jingconsult.online